Sylor API Guide
Next-Gen AI Relay · Fast · Stable · Easy
https://api.sylorapi.com/v1 — use this as your API base URL!Quick Links
Registration 👉 Register Now
1. Open the Registration Page
Visit https://api.sylorapi.com/register, or click the "Register" button at the top right of the homepage.
2. Enter Username and Password
Set your username and password, then confirm the password. No email verification code is required, and any email provider is accepted.
3. Done — Log In and Start
Click "Register" to create your account, then log in and create an API token under "Token Management".
API Examples
Add Custom Provider (Key Step)
Add the following JSON to models.providers block:
"models": {
  "providers": {
    "claude": {
      "baseUrl": "https://api.sylorapi.com",
      "apiKey": "sk-xxxxxx-your-token-here",
      "api": "anthropic-messages",
      "models": [
        {
          "id": "claude-opus-4-6",
          "name": "claude-opus-4-6",
          "reasoning": false,
          "input": ["text"],
          "cost": {
            "input": 0,
            "output": 0,
            "cacheRead": 0,
            "cacheWrite": 0
          },
          "contextWindow": 200000,
          "maxTokens": 8192
        }
      ]
    }
  }
}
cURL Example
curl https://api.sylorapi.com/v1/chat/completions \
  -H "Content-Type: application/json" \
  -H "Authorization: Bearer sk-xxxxxxxx" \
  -d '{
    "model": "gemini-3.1-pro",
    "messages": [{"role": "user", "content": "Hi!"}]
  }'
Python Example
from openai import OpenAI

client = OpenAI(
    api_key="sk-xxxxxxxx",
    base_url="https://api.sylorapi.com/v1"
)

response = client.chat.completions.create(
    model="gemini-3.1-pro",
    messages=[{"role": "user", "content": "Hi!"}]
)
Get API Token
Click Token Management
Show options, select Add Token
Enter Name and Select Group
Enter any name, select Token Group from dropdown
Just keep the default group!!!
Set Expiration and Quantity
Set expiration to Never, quantity to 1
Set Token Quota
Select Unlimited Quota
Model Restrictions (Optional)
Leave model restrictions empty by default
Copy Key
Click Copy button next to the generated key
Claude Code Setup
GitHub farion1231/cc-switch v3.11.1 (click to open)Installation Steps
1. Install Node.js
Visit Node.js official website, download the LTS version on the left for better stability.
2. Install Git
Visit Git official website, the page will automatically recommend the version for your OS.
3. Install Claude Code
Open cmd and install claude-code via npm:
npm install -g @anthropic-ai/claude-codeConfiguration Steps
1. Configure API Info
After launching Claude Code, configure the following API info:
-
API URL:
https://api.sylorapi.com -
API Key: Site token
sk-xxxx - API Format: anthropic-messages
-
Model:
claude-opus-4-6
2. Start
claudeCC Switch Configuration
GitHub farion1231/cc-switch v3.11.1 (click to download)1. Claude Configuration
Open cc switch and select Claude
Launch cc switch and select Claude based on your plugin.
Click Plus to Add Configuration
- Provider Name: Any name
- API Key: Site token
-
Request URL:
https://api.sylorapi.com - API Format: anthropic messages (native)
-
Main Model:
claude-opus-4-6
2. Gemini Configuration
Open cc switch and select Gemini
Select Gemini plugin in cc switch.
Click Plus to Add Configuration
- Provider Name: Any name
- API Key: Site token
-
Request URL:
https://api.sylorapi.com -
Main Model:
gemini-3.1-pro-preview
3. OpenCode Configuration
Open cc switch and select OpenCode
Select OpenCode plugin in cc switch.
Click Plus to Add Configuration
- Provider ID: claude
- Provider Name: Any name
- API Key: Site token
-
Request URL:
https://api.sylorapi.com -
Main Model:
claude-opus-4-6 -
Display Name:
claude-opus-4-6
4. OpenClaw Configuration
Select OpenClaw Interface
Select OpenClaw plugin interface in cc switch.
Click Plus to Add Configuration
- Provider ID: claude
- Provider Name: Sylor API
- API Protocol: anthropic messages
- API Key: Site token
-
API Endpoint:
https://api.sylorapi.com -
Model ID:
claude-opus-4-6 -
Model Name:
claude-opus-4-6
Gemini CLI Setup
Installation Steps
1. Install Node.js
Visit Node.js official website, download the LTS version on the left for better stability.
2. Install Git
Visit Git official website, the page will automatically recommend the version for your OS.
3. Install Gemini CLI
Open cmd and install gemini-cli via npm:
npm install -g @google/gemini-cliConfiguration Steps
Configure (.env)
Create config file at ~/.gemini/.env
GOOGLE_GEMINI_BASE_URL=https://api.sylorapi.com
GEMINI_API_KEY=sk-xxxxxxxx
GEMINI_MODEL=gemini-3.1-proStart
geminiCodeX CLI Setup
Add agents.defaults (Key Step)
Tell OpenClaw to use this provider by default:
"agents": {
  "defaults": {
    "model": {
      "primary": "claude/claude-opus-4-6"
    },
    "models": {
      "claude/claude-opus-4-6": {
        "alias": "claude-opus-4-6"
      }
    }
  }
}
4. Start
codexCodex CC Setup
Example Call Parameters
1. Get API Key
Go to Site Console → Token Management → Copy Token Key.
2. Enter Request URL
Set the request URL to Sylor API's API endpoint:
3. Select Model
Enter model name:
Codex Desktop Setup
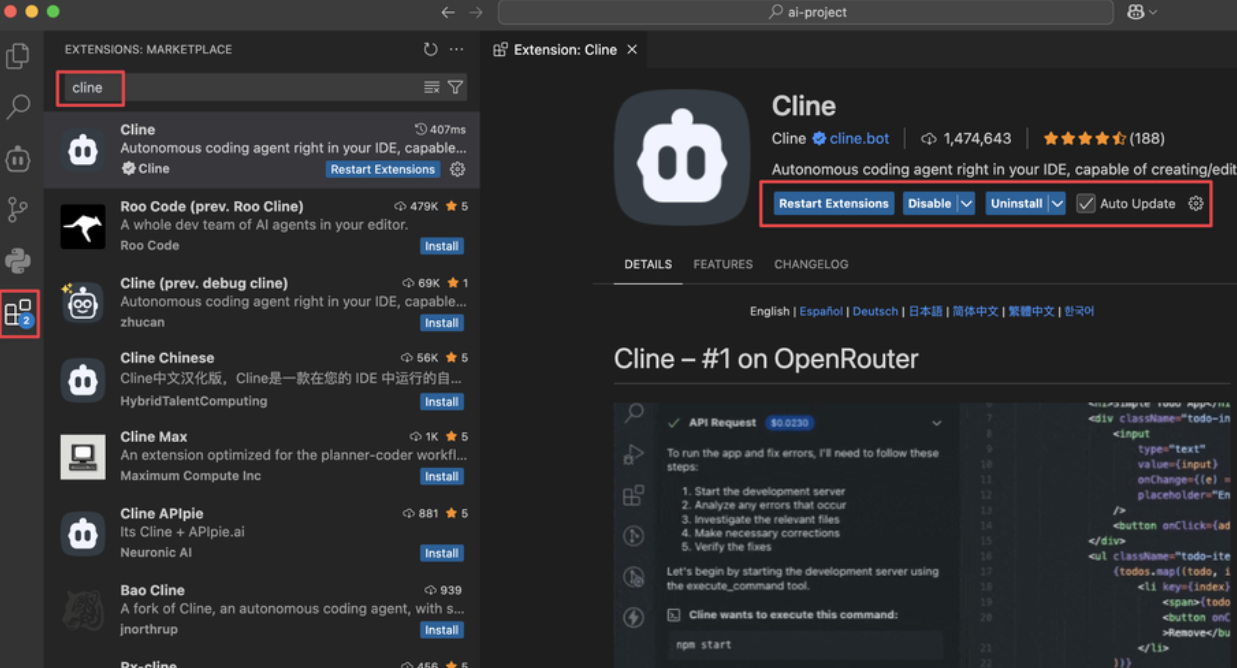
VS Code (Cline)
Configuration
- Install the Cline extension.
- API Provider: OpenAI Compatible
- Base URL:
https://api.sylorapi.com/v1 - API Key: paste your token
- Model ID:
gemini-3.1-pro
OpenClaw Setup
Website https://openclaw.ai/ (official site) GitHub openclaw/openclaw (GitHub repository)Configuration File Download
Alibaba Cloud Configuration
Configure JSON File
Use the following JSON configuration template, replace the tutorial text with the content below, and replace with your own API key:
"models": {
  "providers": {
    "claude": {
      "baseUrl": "https://api.sylorapi.com",
      "apiKey": "sk-xxxxxxx-your-token",
      "api": "anthropic-messages",
      "models": [
        {
          "id": "claude-opus-4-6",
          "name": "claude-opus-4-6",
          "reasoning": false,
          "input": ["text"],
          "cost": {
            "input": 0,
            "output": 0,
            "cacheRead": 0,
            "cacheWrite": 0
          },
          "contextWindow": 200000,
          "maxTokens": 8192
        }
      ]
    }
  }
},
"agents": {
  "defaults": {
    "model": {
      "primary": "claude/claude-opus-4-6"
    },
    "models": {
      "claude/claude-opus-4-6": {
        "alias": "claude-opus-4-6"
      }
    }
  }
}-
Replace
sk-xxxxxxx-your-tokenwith your actual token from Sylor API -
Use
https://api.sylorapi.comas baseUrl -
Use
anthropic-messagesas API protocol -
Use
claude-opus-4-6model
Tencent Cloud Configuration
Select Custom Model Configuration in Custom Server
Open OpenClaw, go to custom server settings, and select custom model configuration.
Configure Custom JSON File
Use the following JSON configuration template:
{
  "provider": "openai",
  "base_url": "https://api.sylorapi.com",
  "api": "anthropic-messages",
  "api_key": "sk-xxxxxxxxx",
  "model": {
    "id": "claude-opus-4-6",
    "name": "claude-opus-4-6"
  }
}
Universal Configuration Template
For other models, use this universal template to connect any OpenAI/Anthropic compatible model:
{
  "provider": "openai",
  "base_url": "https://api.sylorapi.com",
  "api": "anthropic-messages",
  "api_key": "sk-xxxxxxxxx",
  "model": {
    "id": "claude-opus-4-6",
    "name": "claude-opus-4-6"
  }
}- provider: Provider name (customizable)
- base_url: API endpoint
- api: API protocol type (openai-completions or anthropic-messages)
- api_key: Your Sylor API token
- model.id: Model identifier
- model.name: Model display name
1. Local Deployment
Install Node.js
Visit nodejs.org to download LTS version.
Install Git
Visit git-scm.com to download and install.
Verify Installation
After installation, open terminal and run these commands to verify:
node -v
npm -v
Install OpenClaw
npm i -g openclaw2. Core Configuration
Locate Config File
OpenClaw config is in openclaw.json. Find it based on your OS:
| Operating System | Default Path |
|---|---|
| Windows | C:\Users\<Your_Username>\.openclaw\openclaw.json |
| macOS / Linux | ~/.openclaw/openclaw.json |
Add Custom Provider (Key Step)
Add the following JSON to models.providers block. Choose based on your needs:
"models": {
  "providers": {
    "claude": {
      "baseUrl": "https://api.sylorapi.com",
      "apiKey": "sk-xxxxxx-your-token-here",
      "api": "anthropic-messages",
      "models": [
        {
          "id": "claude-opus-4-6",
          "name": "claude-opus-4-6",
          "reasoning": false,
          "input": ["text"],
          "cost": {
            "input": 0,
            "output": 0,
            "cacheRead": 0,
            "cacheWrite": 0
          },
          "contextWindow": 200000,
          "maxTokens": 8192
        }
      ]
    }
  }
}
Add agents.defaults (Key Step)
Tell OpenClaw to use this provider by default. Configure based on your chosen provider:
"agents": {
  "defaults": {
    "model": {
      "primary": "claude/claude-opus-4-6"
    },
    "models": {
      "claude/claude-opus-4-6": {
        "alias": "claude-opus-4-6"
      }
    }
  }
}
Configuration File Download
Add the following JSON to models.providers block:
3. Start Service
Start Gateway Service
openclaw gatewayOpen Link
Tell OpenClaw to use this provider by default:
OpenCode Setup
Website https://opencode.ai (click to open)Configuration Steps
Create Config File
Create opencode.json config file in project root:
{
  "$schema": "https://opencode.ai/config.json",
  "theme": "opencode",
  "provider": {
    "google": {
      "options": {
        "apiKey": "YOUR_API_KEY_HERE",
        "baseURL": "https://api.sylorapi.com/v1"
      }
    }
  },
  "model": "google/gemini-3.1-pro",
  "autoupdate": true
}
Configuration Details
-
apiKey: Replace
YOUR_API_KEY_HEREwith your Sylor API token -
baseURL: API endpoint
https://api.sylorapi.com/v1 -
model: Use
google/gemini-3.1-promodel
Copaw Setup
Website https://copaw.agentscope.io/docs/quickstart (setup guide)Configuration Steps
1. Select Model and Add Provider
Select a model in Copaw and add provider configuration.
2. Create and Add Model
Create new model configuration and enter the model name copied from Sylor API model marketplace (pay-per-use model).
3. Configure API Information
-
API URL:
https://api.sylorapi.com/v1 - API Key: Enter your Sylor API token
- Model Name: Pay-per-use model name from marketplace
4. Save Settings
After saving the configuration, you can start chatting with Copaw.
Dify
Configuration
- Settings -> Model Providers -> OpenAI-API-compatible
- URL:
https://api.sylorapi.com/v1 - API Key: paste your token
- Model:
gemini-3.1-pro
n8n
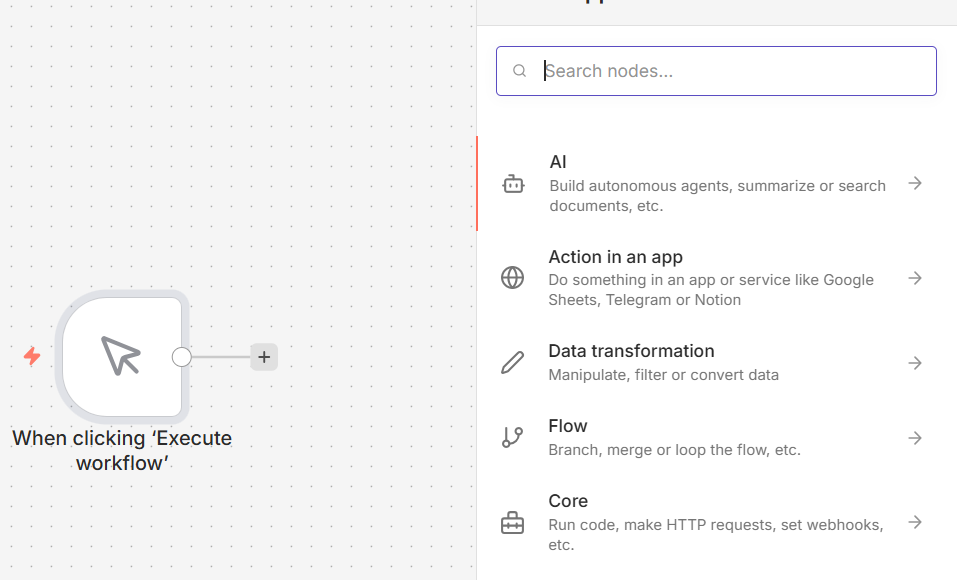
Configuration
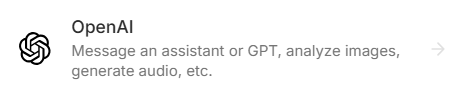
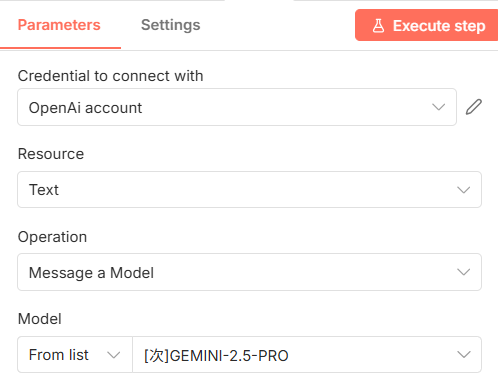
- Add the OpenAI node -> Message a model
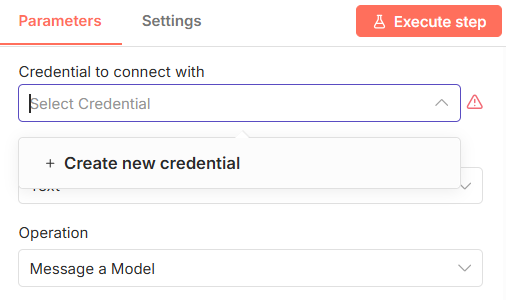
- Credential: Create New -> Custom
- URL:
https://api.sylorapi.com/v1 - API Key: paste your token
- Model:
gemini-3.1-pro

Easydict (macOS)
Configuration
- Service: OpenAI Translate
- API Key: paste your token
- Full URL:
https://api.sylorapi.com/v1/chat/completions - Model:
gemini-3.1-pro
Python SDK
from openai import OpenAI

# Initialize the client
client = OpenAI(
    api_key="sk-xxxxxxxx",              # your token
    base_url="https://api.sylorapi.com/v1" # API endpoint
)

# Send a request
response = client.chat.completions.create(
    model="gemini-3.1-pro",
    messages=[
        {"role": "system", "content": "You are a helpful assistant."},
        {"role": "user", "content": "Hello!"}
    ],
    stream=False
)

print(response.choices[0].message.content)import cv2
import base64
import requests
import os
import math
class VideoAnalyzer:
def __init__(self, video_path):
self.video_path = video_path
if not os.path.exists(video_path):
raise FileNotFoundError(f"❌ Video file not found: {video_path}")
def get_metadata(self):
"""1. Read basic video metadata"""
cap = cv2.VideoCapture(self.video_path)
if not cap.isOpened():
return None
fps = cap.get(cv2.CAP_PROP_FPS)
frame_count = int(cap.get(cv2.CAP_PROP_FRAME_COUNT))
width = int(cap.get(cv2.CAP_PROP_FRAME_WIDTH))
height = int(cap.get(cv2.CAP_PROP_FRAME_HEIGHT))
duration = frame_count / fps if fps > 0 else 0
cap.release()
return {
"width": width,
"height": height,
"fps": round(fps, 2),
"frame_count": frame_count,
"duration_sec": round(duration, 2),
"file_size_mb": round(os.path.getsize(self.video_path) / (1024 * 1024), 2)
}
def extract_keyframes(self, max_frames=5, target_width=512):
"""2. Extract key frames for AI analysis"""
print("📸 Extracting key frames...")
cap = cv2.VideoCapture(self.video_path)
total_frames = int(cap.get(cv2.CAP_PROP_FRAME_COUNT))
if total_frames == 0:
return []
interval = max(1, total_frames // max_frames)
base64_frames = []
for i in range(0, total_frames, interval):
if len(base64_frames) >= max_frames:
break
cap.set(cv2.CAP_PROP_POS_FRAMES, i)
ret, frame = cap.read()
if ret:
h, w, _ = frame.shape
aspect_ratio = h / w
new_height = int(target_width * aspect_ratio)
resized_frame = cv2.resize(frame, (target_width, new_height))
_, buffer = cv2.imencode('.jpg', resized_frame)
base64_str = base64.b64encode(buffer).decode('utf-8')
base64_frames.append(base64_str)
cap.release()
print(f"✅ Extracted {len(base64_frames)} key frames")
return base64_frames
def analyze_content_with_ai(self, api_key, base64_frames):
"""3. Analyze video content with a vision model"""
print("🧠 Asking the AI to analyze the video...")
url = "https://api.sylorapi.com/v1/chat/completions"
content_payload = [
{"type": "text", "text": "These frames were extracted in chronological order from the same video. Describe in detail what happens in the video, including the scene, actions, mood, and key events."}
]
for b64 in base64_frames:
content_payload.append({
"type": "image_url",
"image_url": {
"url": f"data:image/jpeg;base64,{b64}",
"detail": "low"
}
})
payload = {
"model": "gemini-3.1-pro",
"messages": [{"role": "user", "content": content_payload}],
"max_tokens": 1000,
"stream": True
}
try:
response = requests.post(url, headers={"Authorization": f"Bearer {api_key}"}, json=payload, stream=True)
print("\n📝 Video analysis report:\n" + "="*30)
full_analysis = ""
for line in response.iter_lines():
if line:
decoded = line.decode('utf-8')
if decoded.startswith('data: ') and decoded != 'data: [DONE]':
try:
chunk = decoded[6:]
import json
delta = json.loads(chunk)['choices'][0]['delta'].get('content', '')
print(delta, end='', flush=True)
full_analysis += delta
except:
pass
print("\n" + "="*30)
return full_analysis
except Exception as e:
print(f"❌ Analysis failed: {e}")
return None
# Example usage
if __name__ == "__main__":
video_file = r"path/to/your/video.mp4" # replace with your video path
my_api_key = "sk-xxxxxxxx" # replace with your API key
if not os.path.exists(video_file):
print(f"⚠️ {video_file} not found — prepare a video file first.")
else:
analyzer = VideoAnalyzer(video_file)
meta = analyzer.get_metadata()
print(f"\n📊 Video metadata: {meta}")
frames = analyzer.extract_keyframes(max_frames=5)
if frames:
analyzer.analyze_content_with_ai(my_api_key, frames)import requests, json, base64
API_URL = "https://api.sylorapi.com/v1/chat/completions"
API_KEY = "Bearer sk-xxxxxxxx" # replace with your API key
def analyze_image(img_path):
"""Analyze an image"""
with open(img_path, "rb") as f:
img_base64 = base64.b64encode(f.read()).decode()
payload = {
"model": "gemini-3.1-pro", # model name
"messages": [{
"role": "user",
"content": [
{"type": "text", "text": "Describe this image"},
{
"type": "image_url",
"image_url": {"url": f"data:image/jpeg;base64,{img_base64}"}
}
]
}],
"stream": True
}
headers = {
"Content-Type": "application/json",
"Authorization": API_KEY
}
response = requests.post(API_URL, json=payload, headers=headers, stream=True)
for line in response.iter_lines():
if line:
line = line.decode('utf-8').replace('data: ', '')
if line.strip() == '[DONE]': break
try:
data = json.loads(line)
if content := data['choices'][0]['delta'].get('content'):
print(content, end="", flush=True)
except:
continue
print()
# Example usage
analyze_image(r"path/to/your/image.jpg") # replace with your image pathimport requests
import time
import json
import os
def generate_video_stream_with_retry(prompt, api_key, max_retries=3):
"""Streaming video-generation request with retry logic"""
base_url = "https://api.sylorapi.com/v1/chat/completions"
headers = {
"Authorization": f"Bearer {api_key}",
"Content-Type": "application/json"
}
payload = {
"model": "veo_3_1",
"messages": [
{
"role": "user",
"content": f"Please generate a video with this description: {prompt}. Tell me the generation steps or provide the video link directly."
}
],
"max_tokens": 5000,
"temperature": 0.7,
"stream": True
}
for attempt in range(max_retries):
print(f"\n🔄 Attempt {attempt + 1}/{max_retries}...")
full_content = ""
try:
response = requests.post(base_url, headers=headers, json=payload, timeout=120, stream=True)
if response.status_code != 200:
print(f"❌ Request failed, status code: {response.status_code}")
if 500 <= response.status_code < 600:
print("⏳ Server error, retrying after a delay...")
time.sleep(5)
continue
else:
return None
print("✅ Connected, receiving stream...\n")
print("-" * 30)
for line in response.iter_lines():
if line:
decoded_line = line.decode('utf-8')
if decoded_line.startswith('data: '):
data_str = decoded_line[6:]
if data_str.strip() == '[DONE]':
print("\n" + "-" * 30)
print("\n✅ Stream finished")
break
try:
data_json = json.loads(data_str)
delta = data_json['choices'][0]['delta'].get('content', '')
if delta:
print(delta, end='', flush=True)
full_content += delta
except json.JSONDecodeError:
continue
if full_content:
with open("ai_response.txt", "w", encoding="utf-8") as f:
f.write(full_content)
print(f"📝 Full response saved to ai_response.txt")
return full_content
else:
print("⚠️ No content received")
return None
except requests.exceptions.Timeout:
print("⏰ Connection timed out")
time.sleep(5)
continue
except Exception as e:
print(f"❌ Unexpected error: {e}")
return None
print(f"😞 Still failing after {max_retries} attempts")
return None
# Example usage
if __name__ == "__main__":
my_api_key = "sk-xxxxxxxx" # replace with your API key
result = generate_video_stream_with_retry(
prompt="a dog surfing on the ocean",
api_key=my_api_key,
max_retries=5
)
if result:
print("\n🎬 Done")
else:
print("\n❌ Failed")import requests
import json
import os
import re
from datetime import datetime
from pathlib import Path
from typing import Optional, Dict, Any, List
from urllib.parse import urlparse
class ImageGenerator:
def __init__(self):
self.api_key = "sk-xxxxxxxx" # replace with your API key
self.api_url = "https://api.sylorapi.com/v1/chat/completions"
self.model = "gpt-image-2"
self.headers = {
"Authorization": f"Bearer {self.api_key}",
"Content-Type": "application/json"
}
def generate_image(self, prompt: str, save_dir: str = "./generated_images") -> Dict[str, Any]:
"""Generate an image and return its URL"""
Path(save_dir).mkdir(parents=True, exist_ok=True)
payload = {
"model": self.model,
"messages": [{"role": "user", "content": f"Generate an image based on this prompt: {prompt}"}],
"max_tokens": 1000
}
print("Generating image...")
print(f"Prompt: {prompt}")
try:
response = requests.post(self.api_url, headers=self.headers, json=payload, timeout=600)
if response.status_code == 200:
return self._process_response(response, prompt, save_dir)
else:
print(f"API request failed: {response.status_code}")
return {"success": False, "error": f"HTTP {response.status_code}", "image_links": []}
except requests.exceptions.RequestException as e:
print(f"Request error: {e}")
return {"success": False, "error": str(e), "image_links": []}
def _process_response(self, response, prompt, save_dir):
result = {"success": False, "image_links": [], "content": "", "error": None}
try:
response_data = response.json()
if "choices" in response_data and response_data["choices"]:
content = response_data["choices"][0]["message"]["content"]
result["content"] = content
print(f"API response: {content}")
# Extract image links
url_patterns = [
r'https?://[^\s]+?\.(?:jpg|jpeg|png|gif|bmp|webp)',
r'https?://[^\s]+?/image/[^\s]+',
]
found_links = []
for pattern in url_patterns:
matches = re.findall(pattern, content, re.IGNORECASE)
found_links.extend(matches)
if found_links:
result["success"] = True
result["image_links"] = found_links
print(f"Found image links: {found_links}")
else:
result["success"] = True
result["note"] = "The API returned a text description; no image link found"
except Exception as e:
result["error"] = f"Failed to parse response: {e}"
return result
def main():
print("🎨 Image generation script")
print("-" * 50)
generator = ImageGenerator()
prompt = "a cute puppy playing in a garden" # change the prompt here
result = generator.generate_image(prompt=prompt, save_dir="./test_images")
print("\n" + "=" * 50)
if result.get("success", False):
print("✅ Request succeeded!")
if result.get("image_links"):
print(f"\n📷 Found {len(result['image_links'])} image link(s):")
for i, link in enumerate(result["image_links"], 1):
print(f" {i}. {link}")
else:
print(f"❌ Generation failed: {result.get('error', 'unknown error')}")
if __name__ == "__main__":
main()Cursor
Website https://cursor.com/ (click to download)Configuration Guide
Open Settings
Click the gear icon ⚙️ in the top right corner, select Models
Configure API
- OpenAI API Key: Enter your API key (use default token)
-
Override OpenAI Base URL: Check and enter
https://api.sylorapi.com/v1 - Click Verify to validate configuration
-
Enter model name:
gemini-3.1-pro
Cursor Cline Plugin Setup
Website https://cursor.com (click to download)Configuration Steps
- Click extensions and search for cline plugin
-
Configure URL:
https://api.sylorapi.com/v1 - API Key: Copy from Sylor API token management
-
Model:
gemini-3.1-pro-preview
Trae Cline Plugin Setup
Website https://www.trae.ai (click to download)Configuration Steps
- Click extensions and search for cline plugin
-
Configure URL:
https://api.sylorapi.com/v1 - API Key: Copy from Sylor API token management
-
Model:
gemini-3.1-pro-preview
Trae Setup
Website https://www.trae.ai (click to download)1. Open Trae and Click Settings
2. Click "Models"
3. Click "Add Model"
4. Fill in API Info
- Provider: OpenAI
- Model: Custom Model
- Model ID:
gemini-3.1-pro-preview(pick from marketplace) - API Key: sk-key from Token Management
- Custom URL:
https://api.sylorapi.com/v1/chat/completions
5. Save and Enable "Custom"
Click confirm to save, then enable the configured model under "Custom".
6. Click "AI Sidebar"
7. Switch to Configured Model
Click model list and switch to the configured model.
8. Configuration Complete
Roo Code Setup
1. After Install, Click "Use Without an Account"
2. Select Third-Party Provider
3. Fill in Sylor API Configuration
- API Provider: OpenAI Completions
- OpenAI Base URL:
https://api.sylorapi.com/v1 - API Key: sk-your token
- Models can be fetched and selected after input
4. Ready to Use After Configuration
QwenPaw Setup
1. Open QwenPaw and Click Model
Click "model" to enter provider configuration.
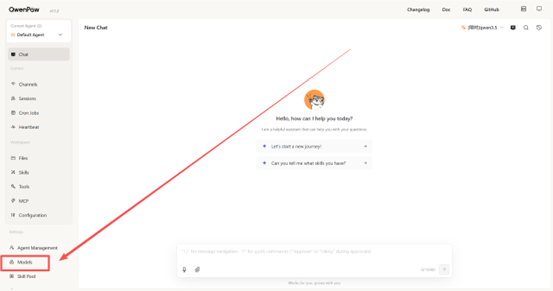
2. Click Add Provider
3. Fill in API Info
- Provider ID: openai
- Display Name: Sylor API
- Default Base URL:
https://api.sylorapi.com/v1 - Protocol: OpenAI-completions (Chat Completions)
Click "create" after filling in the info.
4. Search and Configure Sylor API
After adding, search "Sylor API" and click Models to add models.
5. Add Model
Click Add Model, enter Model ID and Name (must match model marketplace), e.g., gpt-5.5, gemini-3.1-pro.
6. Test Model
Click the test button to verify availability, including multimodal capability.
7. Use in Chat
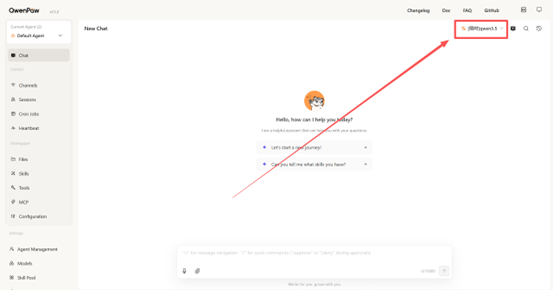
After testing, click chat to return. Select Sylor API provider and model in the top right.
WorkBuddy Setup
1. Click Model Selection
2. Configure Custom Model
3. Select Custom Provider
Click provider category and switch to custom provider.
4. Configure API Info
- API Key: From Token Management
- Endpoint URL:
https://api.sylorapi.com/v1/chat/completions - Model Name:
gemini-3.5-flash - Input: 1000000, Output: 64k
5. Save and Restart
Save and restart the software, then select your custom model.
6. Ready to Use
Claude Code Configuring GPT Model (CC Switch)
Configuration Steps
1. Configure in CC Switch
Open CC Switch and switch API Format to OpenAI Chat Completions.
- API Format: OpenAI Chat Completions
- Request URL:
https://api.sylorapi.com/v1 - API Key: your token key from Token Management
- Model: e.g.
gpt-5.4or other GPT-series models
2. Usage Example
After configuration, you can call GPT/OpenAI models directly in Claude Code.
Hermes Agent Setup
.env configuration file.
Configuration Steps
Modify the .env file in the hermes-agent folder:
1. Find LLM PROVIDER (OpenRouter) Section
Search for the LLM PROVIDER (OpenRouter) section in the .env file.
2. Change OPENROUTER_BASE_URL and Add API Key
Change OPENROUTER_BASE_URL to the following URL and remove the # prefix (uncomment):
OPENROUTER_BASE_URL=https://api.sylorapi.com
Then add a new line below OPENROUTER_BASE_URL:
OPENROUTER_API_KEY=sk-xxxxxxxxxxxxxxxxxxxxxxx
Replace sk-xxxxxxxxxxxxxxxxxxxxxxx with your actual token from Sylor API.
3. Change LLM_MODEL
Find the LLM_MODEL configuration, remove the # prefix (uncomment), and change the value to:
LLM_MODEL=claude-opus-4-6Complete Configuration Example
# LLM PROVIDER (OpenRouter)
OPENROUTER_BASE_URL=https://api.sylorapi.com
OPENROUTER_API_KEY=sk-xxxxxxxxxxxxxxxxxxxxxxx

LLM_MODEL=claude-opus-4-6claude-opus-4-6 is the model name. Use the exact model names shown on our Pricing page, without any vendor prefix:
-
Claude models: e.g.,
claude-opus-4-6,claude-sonnet-4-6 -
Gemini models: e.g.,
gemini-3.1-pro,gemini-3.5-flash -
GPT models: e.g.,
gpt-5.5,gpt-5.4
AstrBot Setup
Configuration Steps
1. Click Configure API After First Login
After first login to AstrBot, click the Configure API button.
2. Click Add Button
Click the Add button to create a new API configuration.
3. Select OpenAI Compatible
Select OpenAI Compatible as the API type.
4. Fill in Configuration and Save
Enter ID, API Key, API Base URL, then click Save Configuration and Get Models.
- API Key: Enter your Sylor API token
-
API Base URL:
https://api.sylorapi.com/v1
5. Get Model List
After saving, you can see all available models from the site.
6. Search and Select Model
You can search for models via the search bar, e.g., select pay-per-use gemini-3.1-pro-preview.
7. Select Chat Mode
Select Chat mode.
8. Select Configured Model
Click the Model button and select the model you just configured.
9. Start Using
After configuration, you can start using the model through conversations.
10. Start Chatting
After configuration, you can start using the model through conversations.
Kelivo
1. Open Settings
After opening Kelivo, click the Settings button in the bottom left corner.
2. Select Provider and Fill in API Info
Select OpenAI provider, then fill in the API information:
3. Complete Configuration
After configuration, you can use Kelivo normally.
OpenCowork Setup
Configuration Steps
1. Click Settings Button
Click the settings button (gear icon in the bottom left) on the OpenCowork interface.
2. Enter API Settings
After entering the settings page, select API Settings.
3. Configure API Info
After entering the API settings interface, fill in the following information:
- API Provider: Select "More Models"
-
API Key: Site token
sk-xxxx(from Token Management) - Protocol: OpenAI
-
Base URL:
https://api.sylorapi.com/v1 -
Model:
gemini-3.1-pro-preview
After filling in the information, click Save Settings.
4. Return to Chat and Use
After setting up, return to the chat page to start using.
Zotero Translation Tutorial
Download https://www.zotero.org/download/ (official Zotero download) Plugin Zotero Plugin Store (Awesome GPT plugin)Configuration Steps
1. Install Zotero and Awesome GPT Plugin
Download and install Zotero, then install the Awesome GPT plugin from the Zotero Chinese community plugin store.
2. Configure Awesome GPT Plugin
-
Config URL:
https://api.sylorapi.com - API Key: Copy sk- key from Sylor API Token Management
-
Model:
gemini-3.1-pro-preview
Chatbox
Website https://chatboxai.app (click to open)Configuration
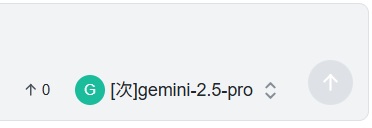
- Settings -> Model Provider -> Custom (manual configuration)
- API Mode: OpenAI API Compatible
- API Host:
https://api.sylorapi.com/v1 - API Key: paste your token
- Model:
gemini-3.1-pro - Note: enable all model capabilities and turn on "Improve Network Compatibility".
Cherry Studio
Download https://www.cherry-ai.com/download (click to download)Configuration
- Visit Cherry Studio official website to download and install
- After opening Cherry Studio, select Other Provider
- Click Add button to create a new provider
- Fill in Provider Name (e.g., Sylor API) and Type, click OK
-
API URL:
https://api.sylorapi.com - API Key: Enter your token
- Click Get Model List to get all available models
- Click OK then select Default Model, Quick Model, and Translation Model
-
Note: Cherry Studio does not need
/v1at the end.
Cherry Studio Image Generation Setup
Configuration Steps
1. Click the Plus Icon in Top Left
2. Select Drawing
3. Select New API as Provider
4. Click Settings to Configure Model
5. Configure API Key + URL, Get Models
Enter API Key and URL, click Get Models, then search for gpt-image-2.
6. Click the Gear Icon Next to Model
7. Change Endpoint Type to "Image Generation (OpenAI)" and Save
Switch endpoint type to Image Generation (OpenAI), then click Save.
8. Return to Drawing Interface to Use
Return to the drawing interface and start using it.
gpt-image-2 model and make sure endpoint type is set to Image Generation (OpenAI).
SillyTavern
Configuration
- API Source: Custom (OpenAI Compatible)
- API Endpoint:
https://api.sylorapi.com/v1 - API Key: paste your token
- Model:
gemini-3.1-pro
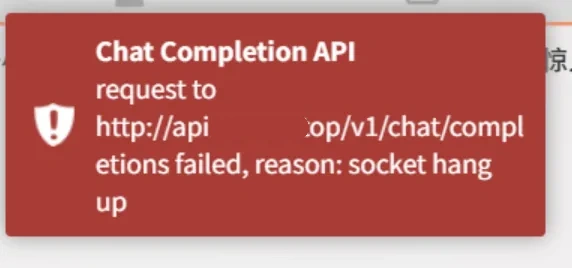

Android SillyTavern Installation
Install Termux
Download and install Termux from F-Droid or GitHub.
Update Packages
Update packages in Termux:
pkg update && pkg upgradeInstall Git
pkg install gitClone SillyTavern
git clone https://github.com/SillyTavern/SillyTavern -b releaseEnter Directory and Install Node.js
Enter SillyTavern directory and install Node.js:
cd SillyTavernpkg install nodejs
Install Dependencies
npm installRun SillyTavern
If already in SillyTavern folder, run the start script:
cd SillyTavern
./start.sh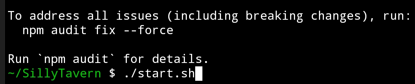
http://127.0.0.1:8000
Configure API
Configure Sylor API in SillyTavern:
- Open Settings and set the Chat Completion Source to Custom (OpenAI-compatible)
- Custom Endpoint URL:
https://api.sylorapi.com/v1 - API Key: paste your token
- Model Name:
gemini-3.1-pro - Click "Fetch Available Models" to verify the configuration
Lovemo
Website lovemo.app (click to open)API Source: Custom (OpenAI Compatible)
Omate
Website omate.org (click to open)API Source: Custom (OpenAI Compatible)
Rikkahub
Website rikka-ai.com (click to open)API Source: Custom (OpenAI Compatible)
Tavo
Website tavoai.dev (click to open)API Source: Custom (OpenAI Compatible)
LifeKline
Website lifekline (click to open)Note: this app uses the gemini-3.1-pro model.
Prompt Optimizer Configuration
Website https://prompt.always200.com/ (click to open)Configuration Steps
1. Click Model Management in Top Right
After opening the Prompt Optimizer website, click the "Model Management" button in the top right corner.
2. Configure API Information
In the Model Management page, configure with the following information:
-
Provider: Select
openai - API Key: Enter your token from Sylor API
-
API URL:
https://api.sylorapi.com/v1
3. Select Model
In model selection, choose gemini-3.1-pro model.
4. Start Using
After configuration, select the configured model to start chatting. The Prompt Optimizer will help you optimize and improve your AI prompts.
XiaoYi
Website xiaoyi.ink (click to open)API Source: Custom (OpenAI Compatible)
SmallPhone
API Source: Custom (OpenAI Compatible)
Connection Reference & Troubleshooting
1. Base URL — the most common mistake
Different clients build the request path differently. Use the form that matches your client:
| Client type | Base URL |
|---|---|
| Anthropic format Claude Code, CC Switch, Cline |
https://api.sylorapi.comwithout /v1 |
| OpenAI compatible Codex, Cherry Studio, official SDKs |
https://api.sylorapi.com/v1with /v1 |
/v1/messages on their own. If your base URL already ends in /v1, the request becomes /v1/v1/messages. Our gateway now corrects this automatically, but setting it correctly from the start is still recommended.
2. What works through our gateway
| Feature | Works | Notes |
|---|---|---|
| Model calls | Yes | Chat Completions, Responses and Messages APIs |
| Skills | Yes | Skills are local files, no account required |
| MCP servers | Yes | Added manually — see section 3 |
| Streaming, tool use, vision | Yes | Standard API features |
| Connectors | No | Requires an Anthropic account login — see section 3 |
3. Connectors do not work — use MCP instead
The good news: Connectors are MCP servers underneath, and manually added MCP servers work fully through our gateway. MCP configuration and authentication are completely independent of your API key and base URL. Most services offered as Connectors also publish an MCP endpoint.
# Remote MCP server over HTTP
claude mcp add --transport http notion https://mcp.notion.com/mcp

# Server that uses OAuth - run /mcp afterwards to sign in
claude mcp add --transport http sentry https://mcp.sentry.dev/mcp

# Server that uses a static token
claude mcp add --transport http github https://api.githubcopilot.com/mcp/ --header "Authorization: Bearer YOUR_GITHUB_PAT"

# Local stdio server
claude mcp add --transport stdio db -- npx -y @bytebase/dbhub --dsn "postgresql://user:pass@host:5432/db"
Type /mcp inside Claude Code to check server status or finish an OAuth flow.
Scopes: --scope local (default, current project) · --scope project (shared through .mcp.json) · --scope user (all your projects).
4. Common errors
| What you see | Cause | Fix |
|---|---|---|
No available channel for model XConfigured model not available |
The model name does not exist on this platform | Check the exact name on the model list. For example we serve gemini-3.5-flash, not gemini-2.0-flash. |
401 Missing bearer or basic authentication with a URL containing api.openai.com |
Base URL was not applied; the client used OpenAI’s default endpoint | Set the base URL and API key, then restart the client. Our gateway returns Invalid token, never that message. |
404 on a path containing /v1/v1/ |
Base URL ends in /v1 for an Anthropic-format client |
Remove the trailing /v1. This is auto-corrected now, but worth fixing. |
Read timed out after 30 seconds |
Client timeout is too short | Raise it to 150 seconds. Vision and long-context requests regularly need more than 30 seconds. |
| Connectors panel is empty | Expected — requires an Anthropic account | Use MCP servers instead, see section 3. |